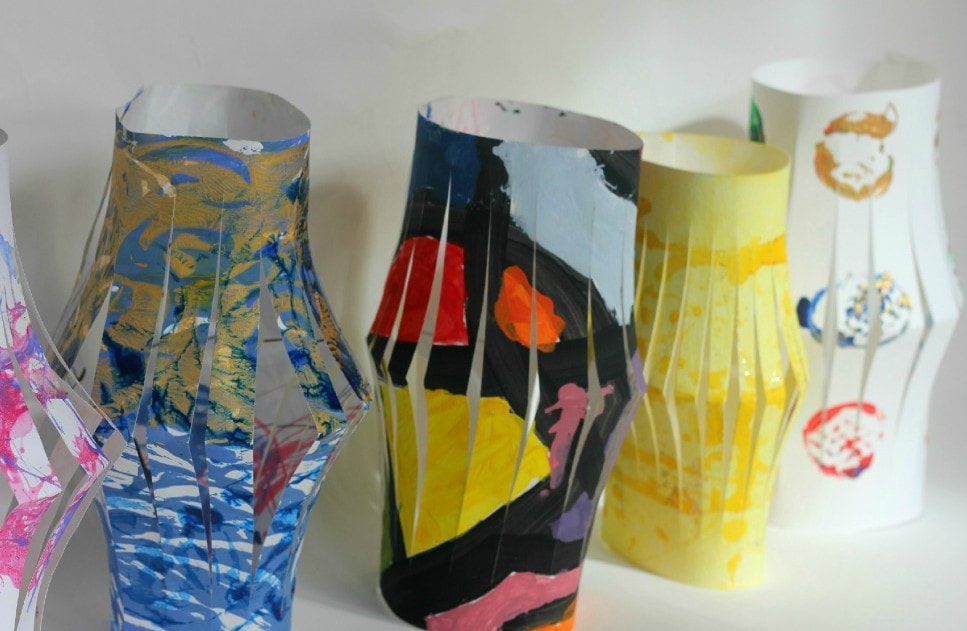
MAY 2020 PAPER LANTERNS are fun to create! You can use a variety of different size papers and different types of paper. You can try construction paper, scrap booking paper, wrapping paper, drawing paper, magazine covers or magazine paper. It is fun to try different papers and if a paper seems too thin--try gluing a paper behind it before you start to just give it a little more thickness.
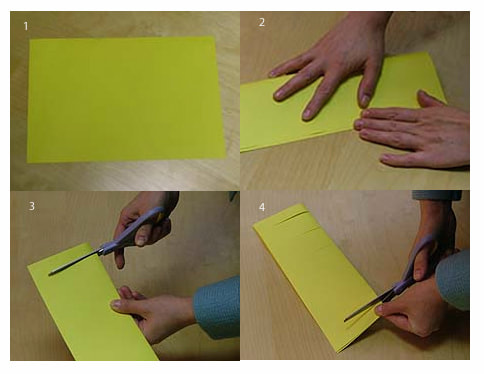
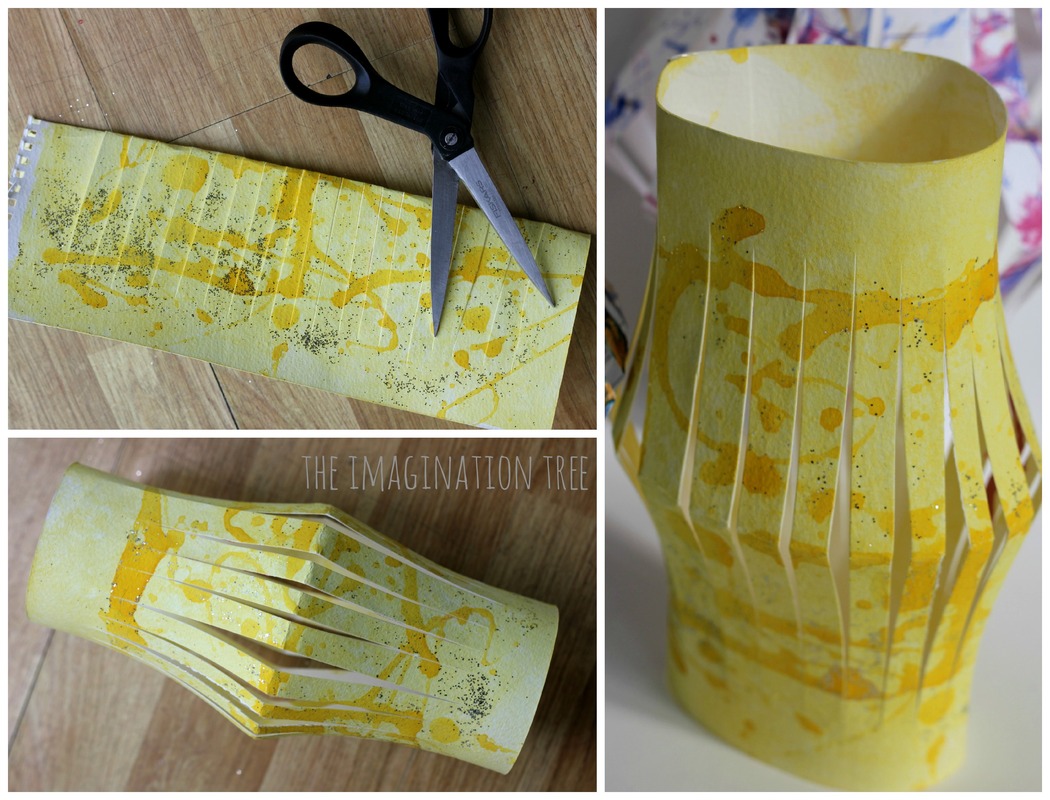
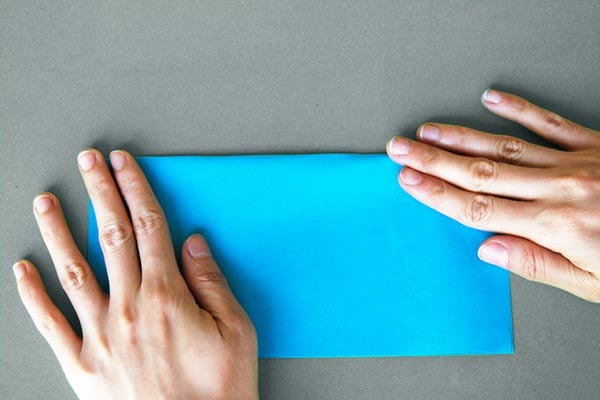
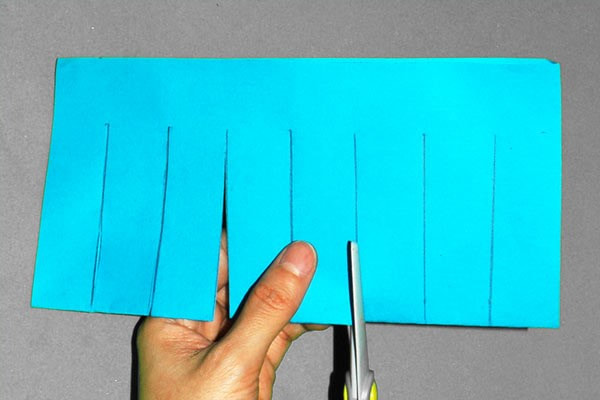
1. In the first group of 4 photos, take your paper, fold it in half, you can draw a line about 2 inches from the OPEN end to guide you. Then cut lines ( you can draw these first too) on the fold to the line at the open end of paper. This is the same way we cut our paper for a paper weaving. You have to start at the fold and make sure you do not cut to the end of the paper. We want this to all be one piece of paper when we are done.
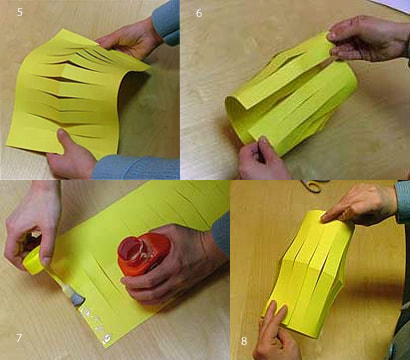
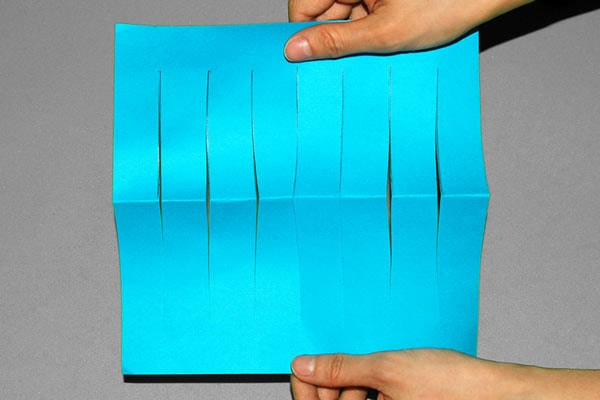
2. Look at the 2nd group of four photos--see how the paper looks when you open it up after cutting. When you bring the sides together it forms the lantern--the fold becomes the center of the lantern. Glue, tape or staple the sides together.
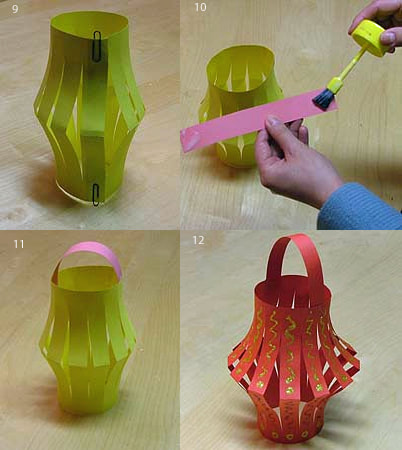
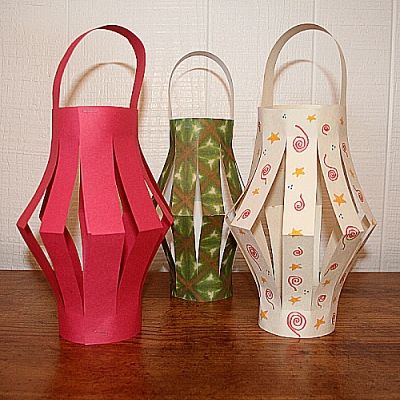
3. In the last group of photos you can see what it looks like to add a handle to the lantern--attach with glue, tape or staples.
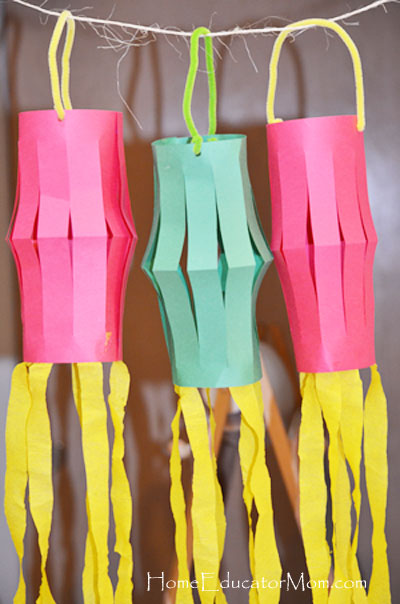
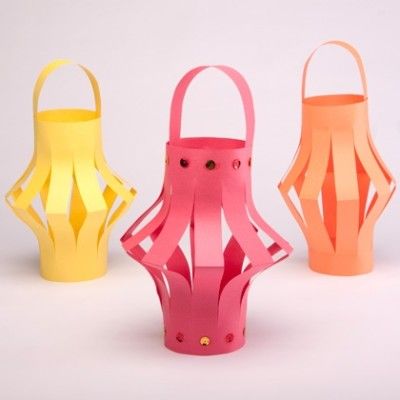
4. Now you know the basic steps to make a lantern! You can get creative by painting or drawing on your paper first --maybe you have a drawing you can use. Or, you can add paint or torn paper pieces after you make your lantern. You can use what supplies you have--look at some of the lantern samples below! Make a group of lanterns and create a garland of lanterns or a fun table decoration! I love projects like this that use simple materials that we may have at home! Send me photos!!!!!
2. Look at the 2nd group of four photos--see how the paper looks when you open it up after cutting. When you bring the sides together it forms the lantern--the fold becomes the center of the lantern. Glue, tape or staple the sides together.
3. In the last group of photos you can see what it looks like to add a handle to the lantern--attach with glue, tape or staples.
4. Now you know the basic steps to make a lantern! You can get creative by painting or drawing on your paper first --maybe you have a drawing you can use. Or, you can add paint or torn paper pieces after you make your lantern. You can use what supplies you have--look at some of the lantern samples below! Make a group of lanterns and create a garland of lanterns or a fun table decoration! I love projects like this that use simple materials that we may have at home! Send me photos!!!!!
MOTHER'S DAY ART
|
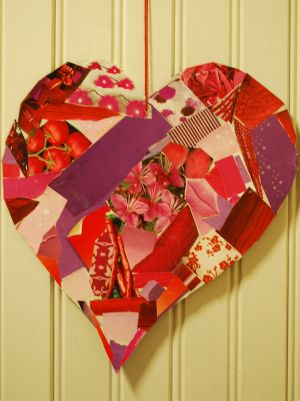
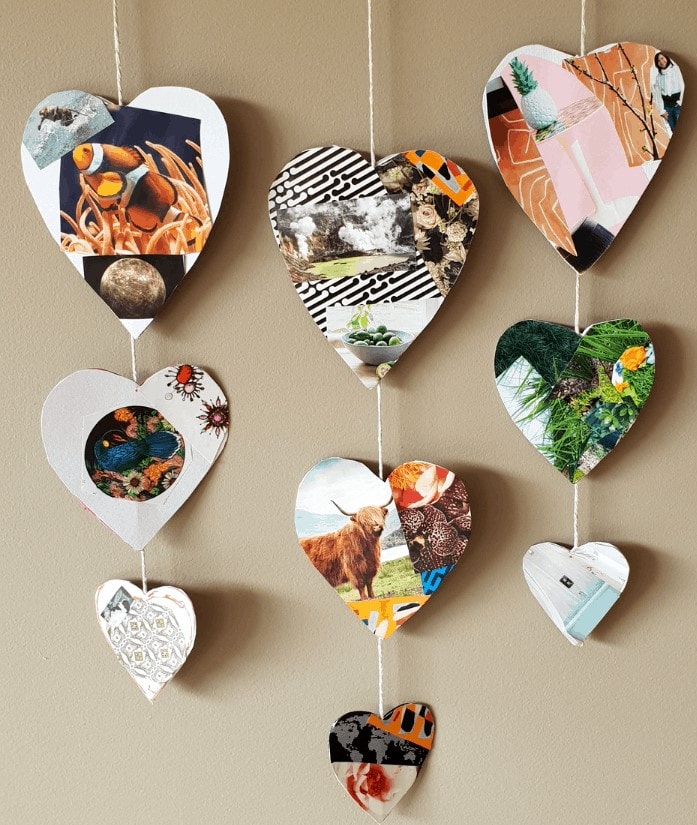
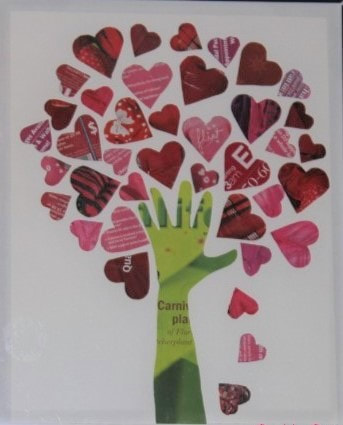
These photos show recycle ideas--collage, hanging hearts and even tracing your hand and arm to form the trunk of a heart tree. You can use these ideas to create your own special Mother's Day art.
|
|
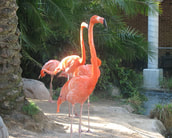
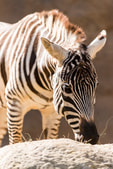
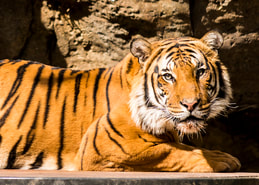
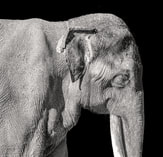
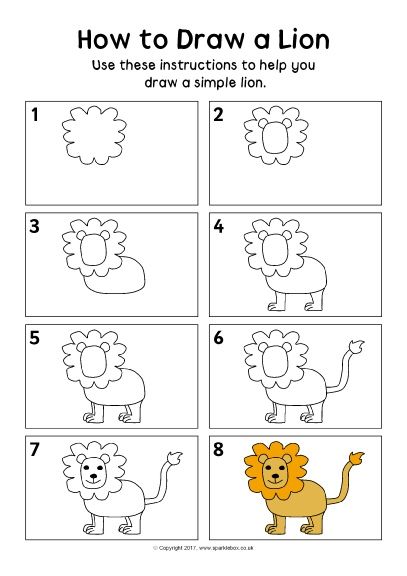
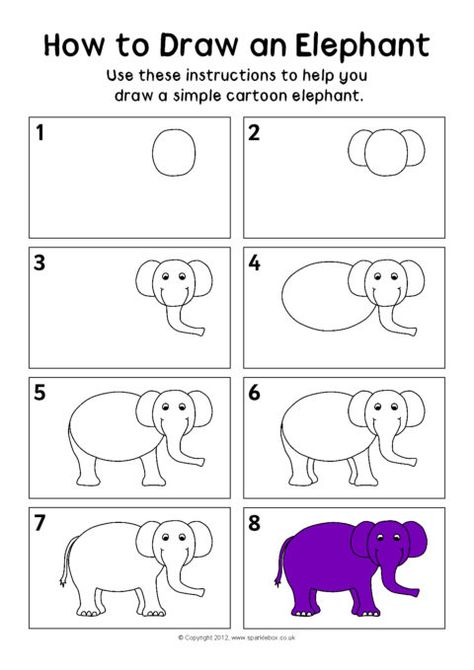
DRAWING ZOO ANIMALS
|
|
|
|
Atlanta Zoo Panda Cam https://zooatlanta.org/panda-cam/
Smithsonian Zoo https://nationalzoo.si.edu/webcams
Go to the Zoo websites, or look at books you have--- or images on the computer --- decide which animal you would like to illustrate and gather materials:
- Sketch book, or any paper you have
- Pencil, colored pencils, crayons, markers, chalks, oil pastels or paints.
- Practice drawing animals with basic shapes
circle, or triangle
Organic shapes----free-form shapes that do not have a name, like a puddle of paint
- Use a piece of paper (could be recycled paper such as brown bag).
- Draw your animal large filling the paper to make an interesting composition--- add details to create textures and patterns. Your animal can be realistic or fantasy—you choose the colors. For example, a gray elephant would be realistic and a pink elephant would be more imaginary---have fun!!!!
- Draw in the background of the animal’s habitat, again—realistic or imaginary.
Collage an animal with torn or cut recycled paper. Be creative!
RECYCLE BUTTERFLY at home learning/April
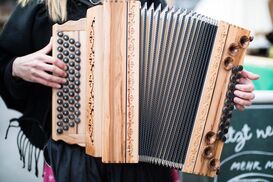
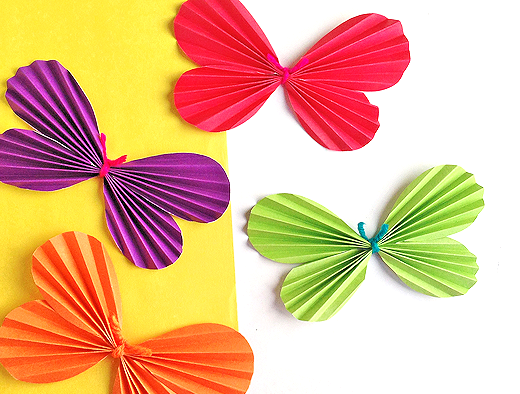
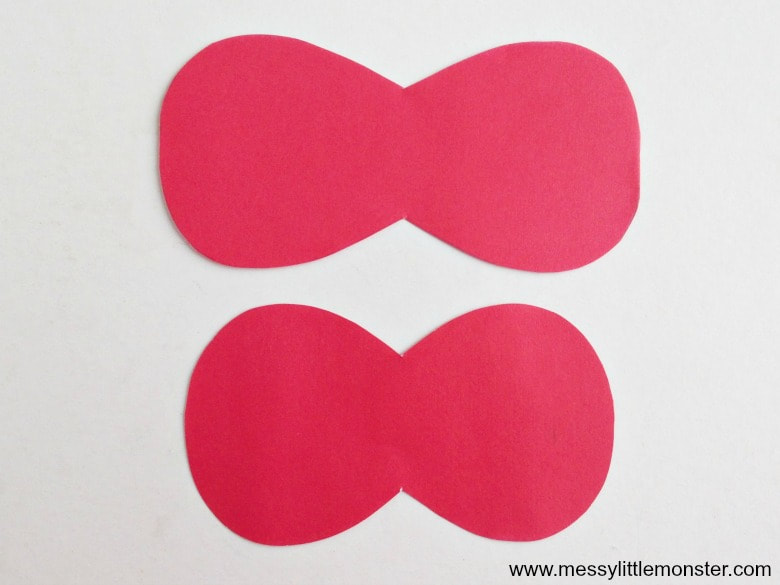
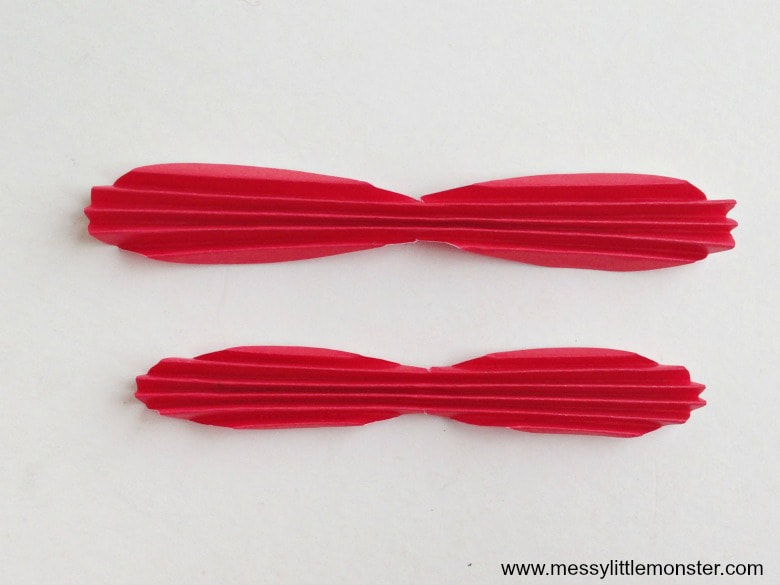
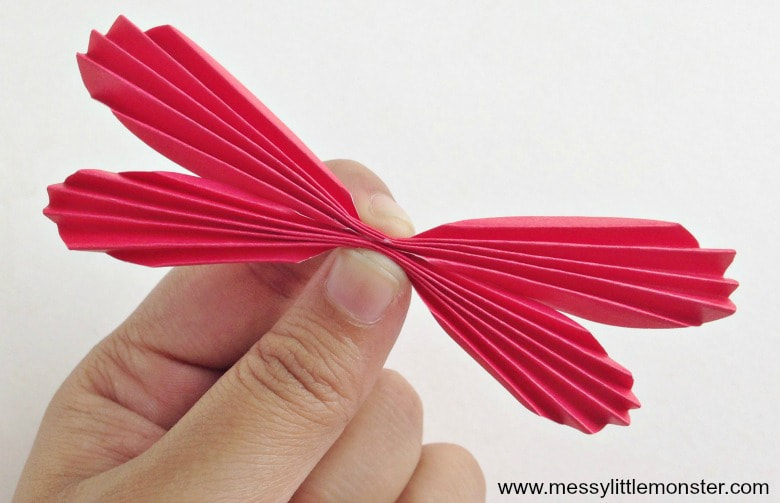
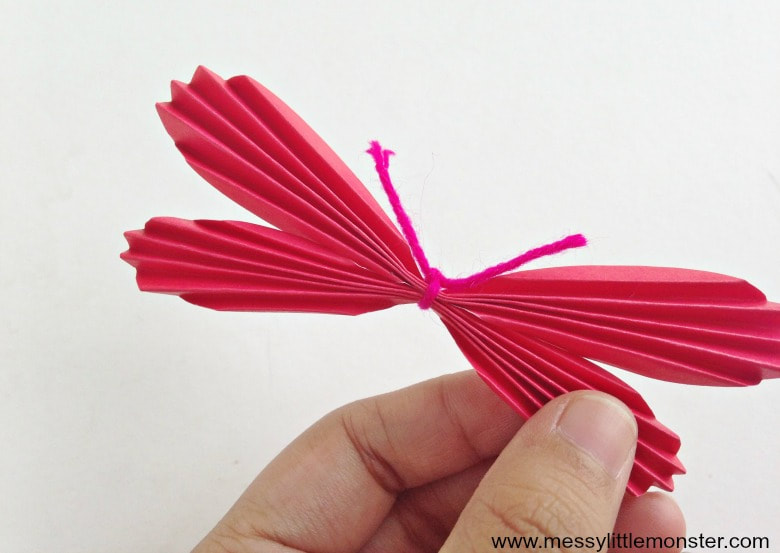
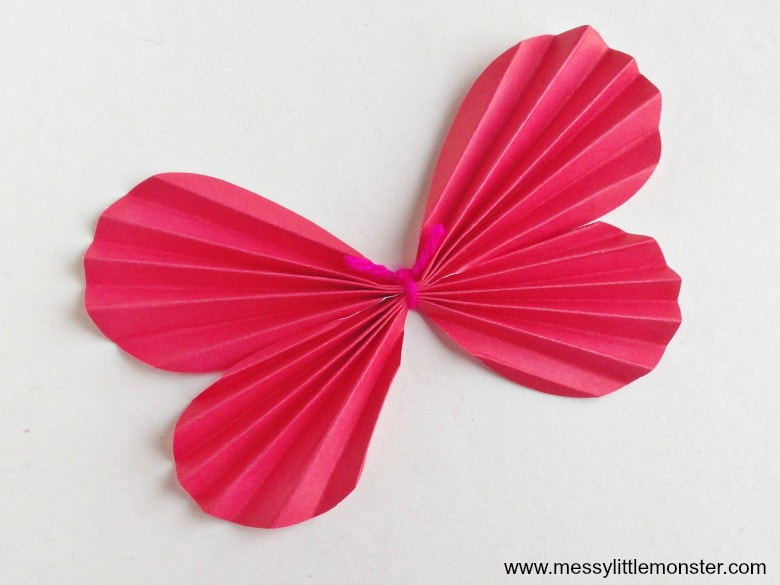
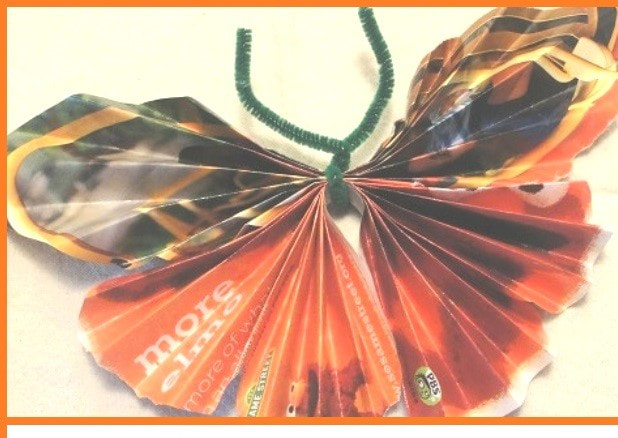
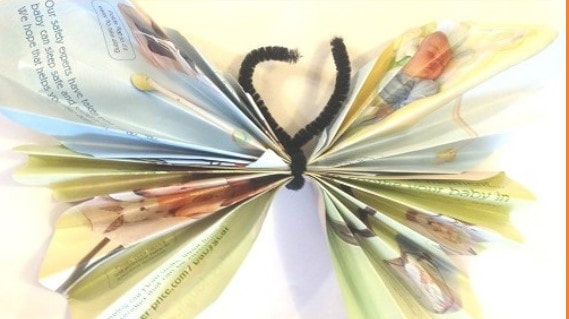
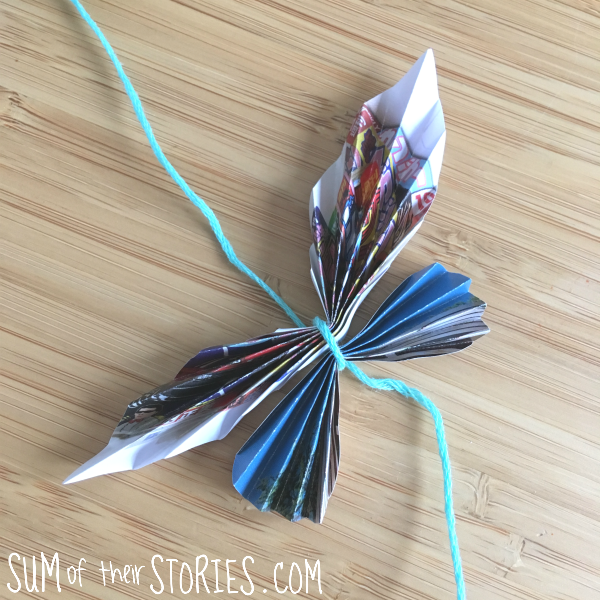
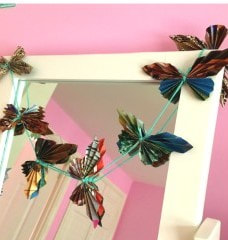
This paper butterfly is a great way to follow a simple pattern and introduces the basis of origami using the accordion fold. The accordion fold uses a back and forth, stair-step fold and is named for the accordion instrument that it resembles, see the photo of the accordion here. This project can be made with any kind of paper you have including magazine or junk mail papers. It is a great project to try with multiple, different papers. You can also change the size of you butterflies. The main thing is to use a slightly larger piece of paper for the top wings and smaller for the bottom wings. You can fold back the edges of the top papers to get a pointed edge or cut a point. Another choice is to cut oval papers for a rounded edge of the butterfly. Look closely at the samples below. Attach the upper and lower body pieces with a string, pipe cleaner or even the twist tie from your bread (those are great to save for art projects!). You can string the butterflies together to create a garland for your house. It is amazing the beautiful things we can create by recycling! When using magazine pieces, wrapping paper, ads, old cards, whatever you find---notice how the colors of the paper create unique and unusual designs on the butterfly once they are folded! I would love to see photos of your work! My email is: [email protected]
MATERIALS: assorted papers, scissors, something to tie with: string, ribbon, pipe cleaner, twist tie, etc.
Arts Integration Activity Week of March 30 post 3
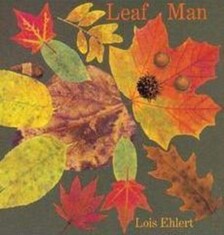
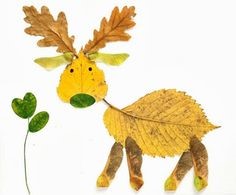
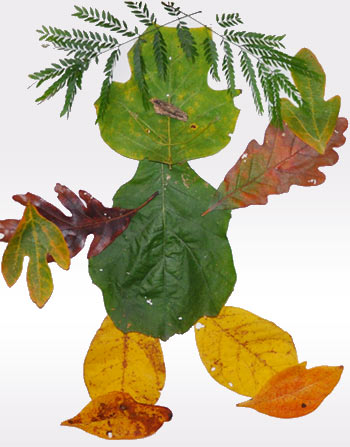
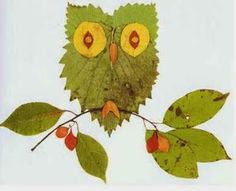
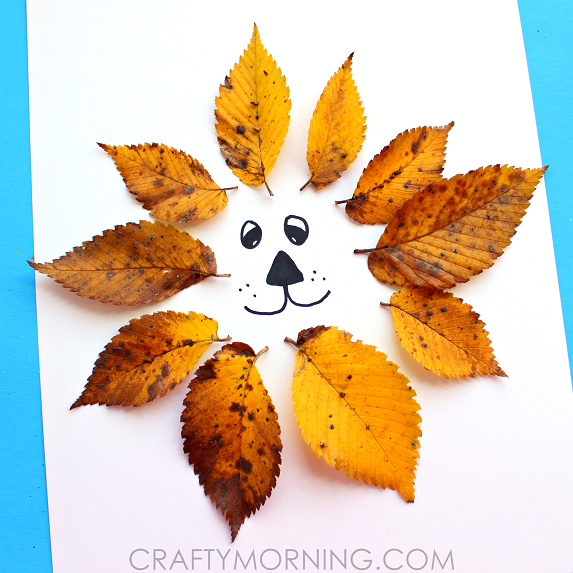
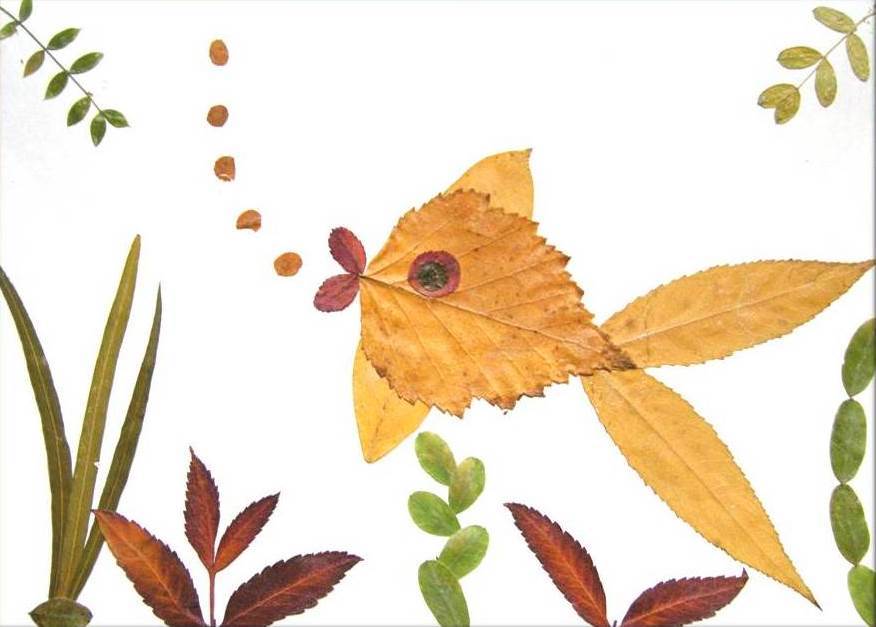
Read the book "Leaf Man" by Lois Ehlert
*Youtube read-aloud is available https://www.youtube.com/watch?v=YvAK2hxNFrY
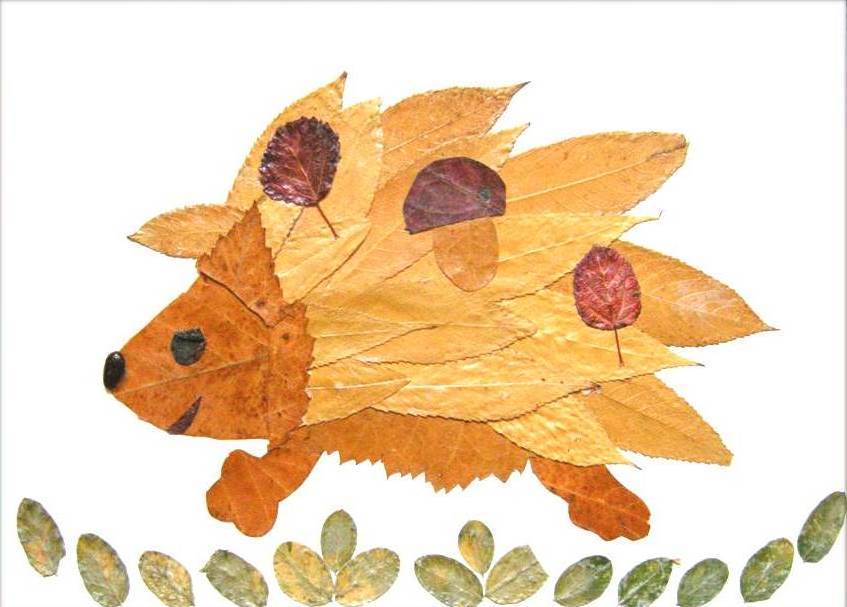
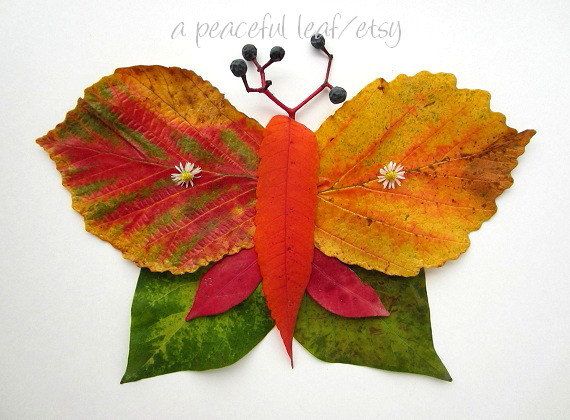
Go on a Nature walk with family and collect nature materials, ex: pine cones, acorns, sticks, stones, flowers--you might want to bring a small bag with you. Bring home the nature materials. Assemble your nature materials on a piece of paper to create your own Leaf Man or Leaf Animal. Take a picture of it! You can email me your photo at [email protected].
Write about your creation and what nature items you used.
Look at some of the ideas below and have fun!!!!!
Read the book "Leaf Man" by Lois Ehlert
*Youtube read-aloud is available https://www.youtube.com/watch?v=YvAK2hxNFrY
Go on a Nature walk with family and collect nature materials, ex: pine cones, acorns, sticks, stones, flowers--you might want to bring a small bag with you. Bring home the nature materials. Assemble your nature materials on a piece of paper to create your own Leaf Man or Leaf Animal. Take a picture of it! You can email me your photo at [email protected].
Write about your creation and what nature items you used.
Look at some of the ideas below and have fun!!!!!

POST 2---- Week of March 23
Paper Weaving Review
Look at the photos below to guide you through setting up a paper weaving.
Fold your paper in half and have the mouth of the paper (where it opens) face you.
Place a ruler at the bottom edge of the paper to hold the mouth closed and draw a line across.
This very important line becomes your stop sign---you never cut pass this and keep the paper folded when you cut .
To cut begin at the fold and cut to the line (your stop sign)
You can experiment with how far apart you place your cutting lines. For the first time, don't put them too close and use a ruler! The second time you can place cutting lines closer and even try some wavy lines. It is best to draw the lines before you cut.
Prepare strips as long as your paper to use for weaving. You can use any kind of paper, junk mail, scrapbook paper, brown bags, ribbon, fabric scraps, construction paper, tissue paper----just experiment and even try a combination of materials.
Weaving follows a simple over / under pattern. the second row is the opposite of the first row. The third row is the same as the same as the first row and you keep alternating to create a "checkerboard pattern".
Think about how we painted our weavings in class and added lines at the end to make it look like a carpet or fabric. This would be a great time to experiment with color and design as you complete your weaving and review the steps!!!!! Remember to email me a photo of your completed weaving!
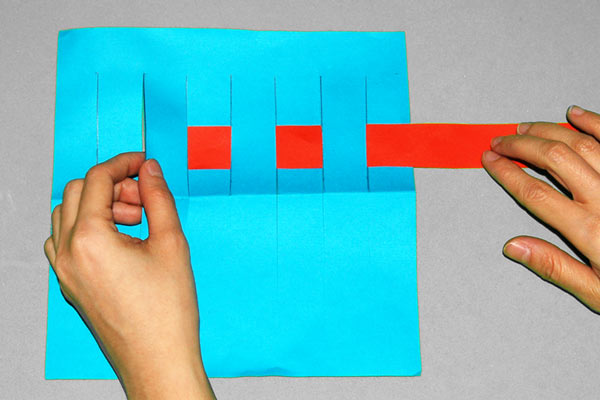
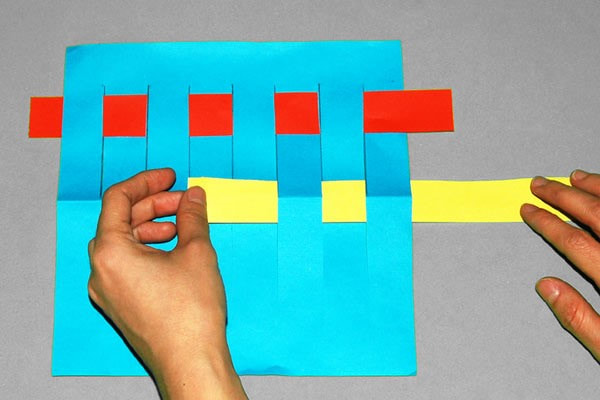

|
|
|
|
Georgia O'Keeffe
|
|
WHO IS SHE AND WHAT IS SHE FAMOUS FOR?
Born in 1887, Georgia O'Keeffe was an American artist who painted nature in a way that showed how it made her feel. She is best known for her paintings of flowers and desert landscapes.
She played an important part in the development of modern art in America, becoming the first female painter to gain respect in New York's art world in the 1920 s. Her unique and new way of painting nature, simplifying its shapes and forms meant that she was called a pioneer.
ACTIVITY
We drew a variety of close up flowers in class and this would be a good time to try those again.
You can draw one close up flower or several on one paper.
You only need something to draw with --a pencil, crayon or marker---any drawing material and any paper.
You can add color with crayons or paint--or both!
You can fold your paper in half and turn it into a card for someone in your family.
You can look at the flowers above and look at the shapes to try to draw them---start in the center.
You may be able to find a flower growing in your yard that you can try to draw, remember, look closely!!
WHAT INSPIRED Georgia O'Keeffe?
The artwork below is a landscape. Can you see how she has simplified the shapes of the hills in the painting?
ACTIVITY:
Using drawing materials, crayons, paints, pencils--whatever you have at home--draw overlapping mountains like Georgia O'Keeffe. Start at the bottom of the paper and use a small hill and keep getting bigger. Look at the use of color to make the different layers stand out. Using value (light and dark of a color) helps the layers of hills stand out. You don't need to use the same colors you see here--be creative---try this more than once--each time it can be different!
If you would like to email me a photo of your work, I would love to see it--remember to include full name and class code / teacher name.

